
Packaging Format Changeovers: What to Record and Verify
A format changeover checklist: seven steps from preparation to run monitoring, a record template, and the SMED idea of external versus internal work.
A reliable changeover follows a fixed sequence, from preparation while the machine runs through line clearance, part and setting changes, recipe verification, a first-off check and quality release. Recording settings, recipe version, material lots and the first-off result makes each changeover repeatable and auditable.
Applies to: Covers format and product changeovers on packaging machines and lines, including the sequence, records and verification points. Does not give machine-specific settings, cleaning validation methods or safe-work procedures, which come from the machine manual and site procedures.
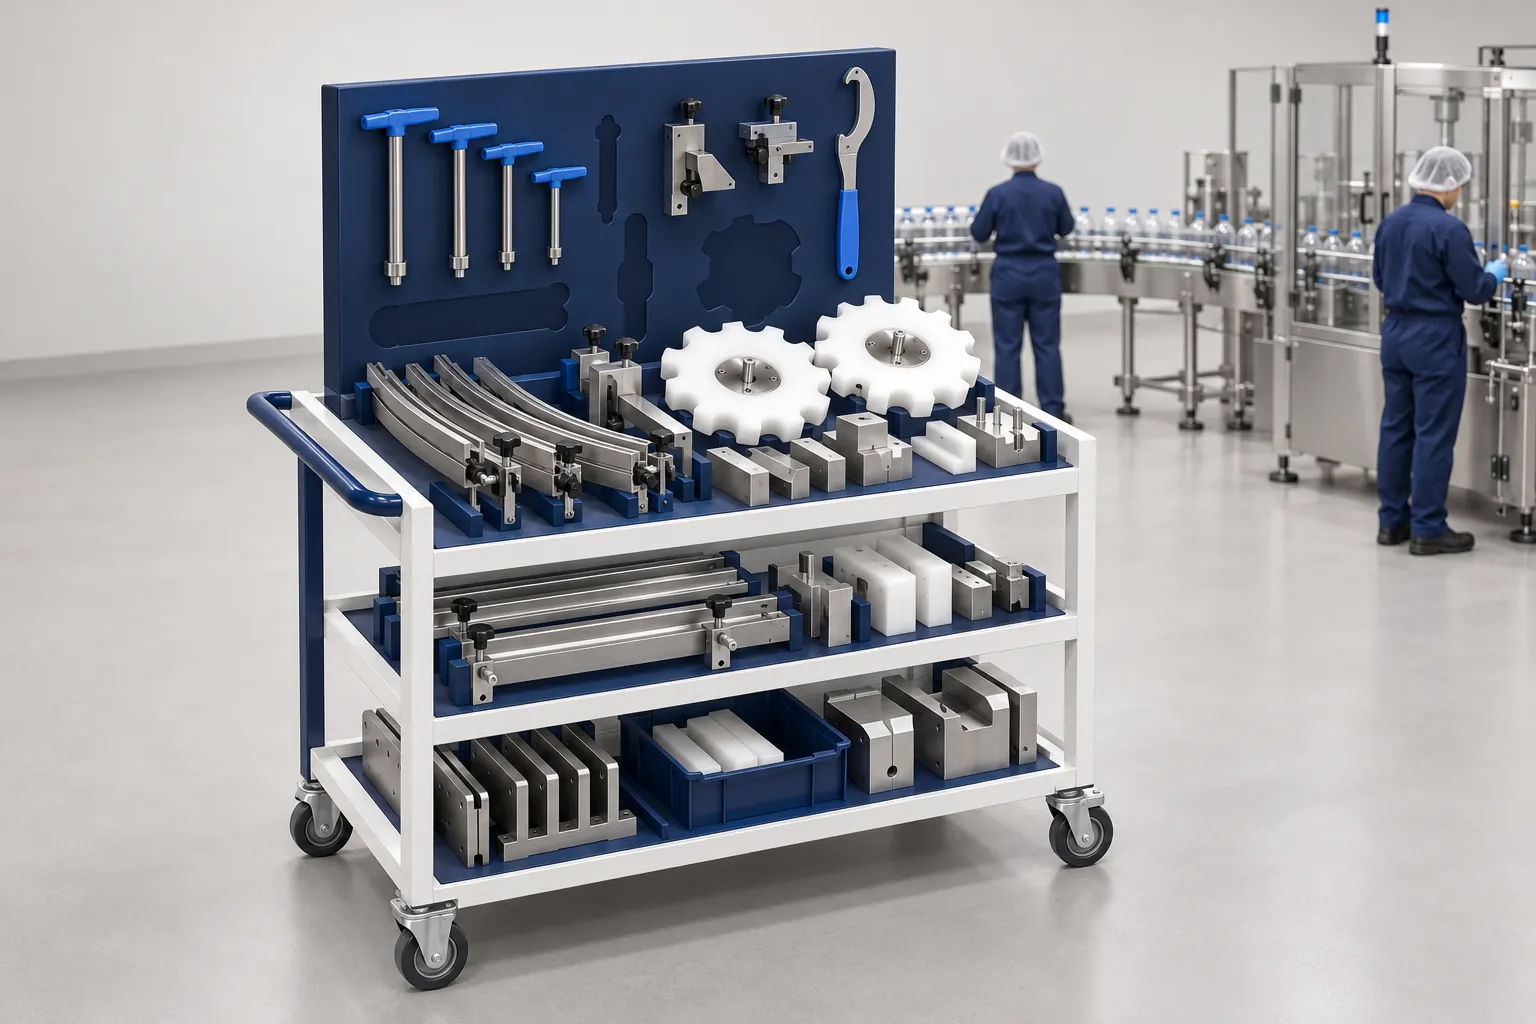
Changeovers are where packaging lines lose time and where many quality problems begin. A wrong format part, an old recipe left loaded, a label from the previous run still in the hopper or a setting nudged by feel can produce a shift of rejects, or a mix-up found only at the customer. Most plants know this, yet the sequence often lives in the heads of a few experienced operators.
The remainder of this page sets out a seven-step changeover sequence, the SMED split between external and internal work, and a record template. It gives no settings for any machine. Those belong to the machine manual and your own validated procedures.
Swipe sideways to see the other columns. The first column stays visible.
| Step | Machine state | Release evidence |
|---|---|---|
| 1 Prepare | Running. External work. | Parts, tools, materials and the order are staged |
| 2 Stop and line clearance | Stopped. | Who cleared the previous product, film and labels |
| 3 Change parts and settings | Stopped. | Parts fitted and the settings actually made |
| 4 Load and verify recipe | Running or stopped, as the procedure sets | Recipe name, version, and that no old override is still active |
| 5 First-off check | Running or stopped, as the procedure sets | Result against the criteria, with the sample identified |
| 6 Quality release | Running or stopped, as the procedure sets | Decision and the signature the site procedure names |
| 7 Run and monitor | Production resumes | Checks after release, with the time of any adjustment |
A wrong recipe or a label left from the previous run is a rejected batch, not a small correction at the end of the shift. The row is not evidence until the release signature is on the record.
How a changeover is sequenced
The BASF rPCF binder review shows how a proposed material change can need document review without assuming a new equipment setup.
For a proposed metallic coating system, the Stahl Senoprint press review separates product identity changes from the actual job sequence.
The SIG Neo changeover analysis shows why a published size or format change time needs a defined transition and release boundary.
A format changeover moves a line from one product, pack size or material to another. The figure shows the order of the steps and, where it is fixed, whether the machine is running or stopped during each.
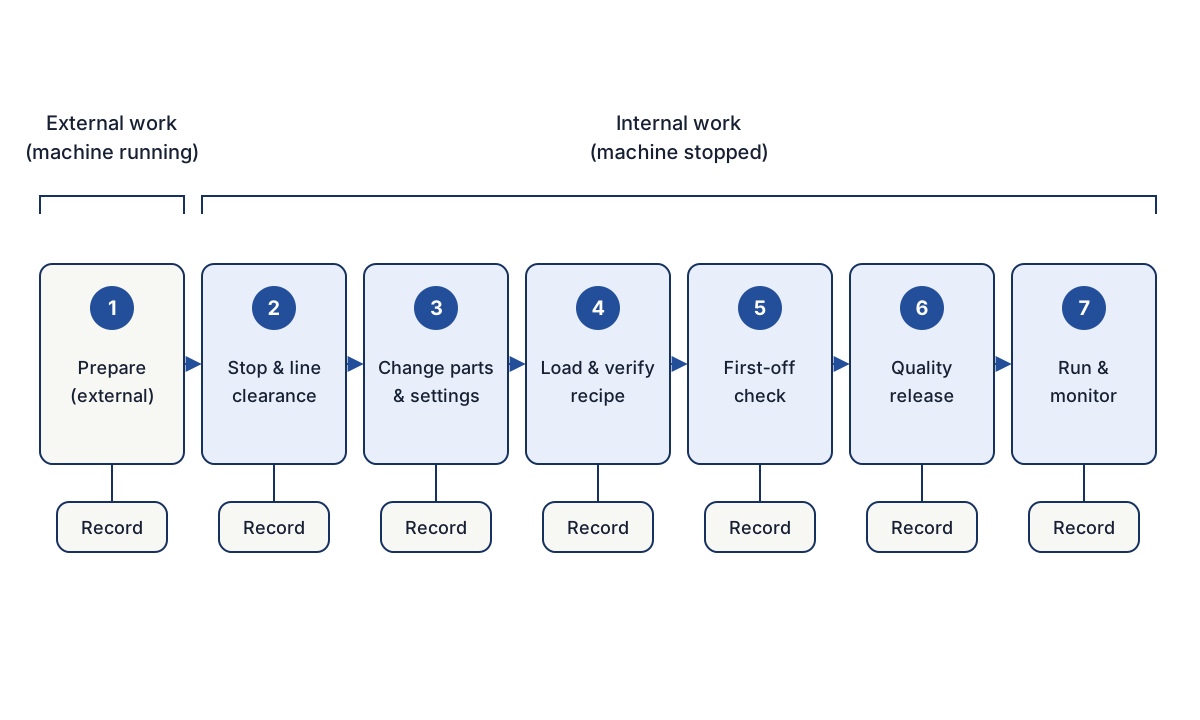
The steps are:
- Prepare (external): gather parts, tools, materials and documents while the machine is still running.
- Stop and line clearance: stop the machine safely and remove the previous product, packaging materials and labels.
- Change parts and settings: fit the new format parts and adjust the settings the procedure calls for.
- Load and verify recipe: load the recipe for the new product and confirm it is the right one, in the right version.
- First-off check: run and inspect the first packs against defined criteria.
- Quality release: an authorized person confirms the first-off result and releases the run.
- Run and monitor: produce, with checks at defined points to catch drift.
Each step has its own record, shown under it in the figure and described step by step below.
External and internal work (SMED)
SMED, short for Single-Minute Exchange of Die, comes from Shigeo Shingo’s work on shortening setup times. It separates internal work, which can be done only while the machine is stopped, from external work, which can be done while it is still running. The next move is to convert internal work to external wherever possible and to simplify what must stay internal.
In the sequence above, only step 1 is fully external, and steps 2 and 3 are internal by nature. Step 4 is internal on many machines, though some controllers let you stage a recipe in advance. Steps 5 and 6 may happen with the machine running at reduced output or stopped, depending on the product and the quality plan.
Work that can often move from internal to external, once the machine and procedure allow it, includes:
- Staging format parts, tools and fasteners at the machine before the stop.
- Pre-checking that parts are clean, complete and undamaged.
- Pre-printing or preparing labels, film reels, cartons and lot paperwork for the next run.
- Preparing the changeover record with the planned product, recipe and material lots.
- Cleaning or preparing the next set of parts offline.
Whether a task can safely move outside the stop is a risk assessment question, not a convenience one. Work near moving parts, energy sources or open guards must follow the site risk assessment under ISO 12100 and the energy isolation procedures that apply. In the US, OSHA 29 CFR 1910.147 covers the control of hazardous energy during servicing, and other markets have their own rules.
Step-by-step: what to do and record
Swipe sideways to see the other columns. The first column stays visible.
| Step | Typical actions | What to record |
|---|---|---|
| 1 Prepare (external) | Confirm the production order; stage format parts, tools and materials; check part condition; print or collect labels and lot paperwork | Order and product; parts and tools checked; materials staged with lot numbers |
| 2 Stop & line clearance | Stop the machine by the normal procedure; remove product, film, cartons, labels and rejects from the machine and conveyors; clean as the procedure requires | Time stopped; clearance checked by whom; areas cleared |
| 3 Change parts & settings | Remove old format parts; fit new ones; set guides, heights, speeds and other settings from the changeover sheet | Parts fitted; settings as set; any deviation from the sheet |
| 4 Load & verify recipe | Load the recipe; compare name and version with the production order; check values on screen against the sheet | Recipe name and version; who verified; any manual overrides |
| 5 First-off check | Run to the point defined; take first-off packs; check against the criteria | Results for each criterion; sample identification |
| 6 Quality release | Review first-off record; authorize or reject the start | Release decision, signature, time |
| 7 Run & monitor | Produce; check at the intervals set in the quality plan; watch for drift | Checks done; adjustments made; time of any intervention |
Step 1: prepare while the machine runs
Preparation is where most of the time can be saved and many errors prevented. Each product and format needs a changeover sheet listing its parts, tools and settings. Staging the right parts at the machine beforehand avoids searching during the stop. Confirm that the incoming materials match the order and that lot numbers are visible for the record.
Step 2: stop and line clearance
Line clearance means removing everything from the previous run that does not belong to the next: product, packaging materials, labels, printed items and rejects. It reduces the risk of mix-ups and cross-contamination. How thoroughly a line must be cleared, and whether cleaning needs validation, depends on the product and market, such as allergen or pharmaceutical requirements, and on your site’s quality system. Record who confirmed clearance and how.
Stop the machine through the normal procedure and apply energy isolation where the changeover tasks require it.
Format parts can pinch or cut, and changeovers put people close to open guards and moving mechanisms. Follow the machine manual, the site risk assessment under ISO 12100 and the site’s lockout procedures. Never bypass a guard or interlock to speed a changeover, and do not adjust energized equipment unless the procedure explicitly allows it and qualified personnel are present. Qualified people should also review any new tool, procedure or time-saving idea before it is used.
Step 3: change parts and settings
Use the changeover sheet as the single source for settings. Record what was actually set, not only what the sheet says, so deviations show. Where the machine has scales, counters or position indicators, use them and record the readings. Servo-driven or recipe-driven adjustments reduce manual settings, which helps repeatability. The guide on PLC, HMI and motion control covers the related control concepts.
Typical error sources at this step are parts from a similar format with a small difference, worn parts that no longer hold a setting, missing fasteners, and settings adjusted during the last run and never written back to the sheet. The amount of changeover work also differs between machine types, as the guide on VFFS versus premade pouch machines discusses.
Step 4: load and verify the recipe
A recipe is the set of parameters stored in the controller for a product and format. Loading it is quick, and verifying it is where errors get caught. Check that:
- The recipe name matches the production order.
- The version is the approved one and not an older copy.
- Key values on the HMI match the changeover sheet.
- No temporary manual override from the previous run is still active. Revoke it, or write it into the approved recipe, before anyone signs the release. An override left on means the version on the record is not the version running. Who may change a recipe is set by the site’s access rules.
- Any alarms or warnings on start-up are understood and cleared.
Control access to recipe changes. If operators can edit a recipe freely, a version number means little. Ask the supplier whether the machine has access levels, change logs and recipe backup.
Step 5: first-off check
The first-off check shows that the line is producing what the order says before a large quantity is made. Its scope depends on the product and the quality plan. Typical categories include:
- Pack appearance, dimensions and formation.
- Seal integrity by the agreed visual or test method.
- Fill or net quantity by the agreed method.
- Code, label content and position, including readability.
- Material and lot identification matching the order.
- Reject and inspection devices challenged with a test piece, where the quality plan requires it.
If the first-off fails, do not release the run. Go back to the failed step, change one variable at a time, record each change, and repeat the first-off. Who may restart the machine is set by the site procedure, not by this page. When seal quality is the issue, the guide on seal defect investigation gives a structured way to collect evidence instead of adjusting everything at once.
Step 6: quality release
An authorized person makes the release decision, not whoever is nearest the machine. The site’s quality procedure names who may sign. This page does not assign that role, and it does not say which tasks are safe to do with the machine running. Release confirms that the first-off meets the criteria, that line clearance was done, and that materials and recipe match the order. The signature or electronic confirmation, with time, goes on the changeover record. If your plant allows a conditional release with extra checks, write down the conditions.
Step 7: run and monitor
After release the risk is drift: settings moving, parts wearing, materials changing between reels or lots. The quality plan should define check points, such as set intervals, each material change and each stop of a defined length. Record adjustments and their times. Repeated adjustments in the first minutes after a changeover point to a setting or parts problem that belongs on the changeover sheet.
Changeover record template
Keep one record per changeover. Copy the blank sheet below into a document your site controls, or use the table. Neither sheet is a completed record, and neither replaces the site procedure.
Line and machine:
From product / format:
To product / format and order number:
Stop time / release time / production start:
Prepared by (external work), and time:
Line clearance: done by / checked by / areas cleared:
Parts fitted:
Settings applied:
Recipe name and version, verified by:
Open override revoked or written into the recipe:
Material lots:
First-off result and sample id:
Quality release: decision / signature / time:
Deviations:
Run checks after release:
Swipe sideways to see the other columns. The first column stays visible.
| Field | What to enter |
|---|---|
| Line and machine | Identifier for the line and machine |
| From product / format | The run just completed |
| To product / format | The run starting, with order number |
| Changeover start and end | Times for the stop, for release and for production start |
| Prepared by (external work) | Name and time of completion |
| Line clearance | Done by, checked by, areas cleared |
| Parts fitted | Part numbers or identifiers, with condition notes |
| Settings applied | Values as set for each item on the changeover sheet |
| Recipe name and version | As loaded, and who verified |
| Material lots | Film, cartons, labels, product and other components, with lot numbers |
| First-off result | Criteria checked, results, sample identification |
| Quality release | Decision, signature and time |
| Deviations | Anything different from the sheet, with reason |
| Run checks | Checks done after release, with results |
The records give traceability if a problem appears later, a basis for improving the changeover sheet, and data on how long each step takes. The time stamps feed the analysis in the bottleneck guide, because changeover time is a category of down time that can sit at the constraint machine. A consistent state or reason code for changeover time also helps reporting, including with machine state models such as PackML.
Information to request from suppliers
- A changeover procedure for each format the machine is sold to run, with the parts and tools listed.
- Which adjustments are tool-free, indexed or recipe-driven, and which need manual setting.
- Format parts storage and handling recommendations.
- Recipe management features: version identification, access levels, change log and backup.
- Whether changeover tasks need energy isolation, and the procedures for them.
- Any features intended to reduce internal time, such as quick-release fixtures or part pre-staging.
- Training and documentation for operators and maintenance.
Checklist for a changeover
- Production order confirmed and changeover sheet for the new product at the machine.
- Format parts, tools and materials staged and checked while the machine ran.
- Machine stopped and made safe by the site procedure.
- Line clearance completed and recorded.
- New format parts fitted and settings applied, with values recorded.
- Recipe name and version verified against the order.
- First-off packs taken and checked against defined criteria.
- Quality release signed before the run starts.
- Monitoring checks scheduled for the run.
- Record complete, with deviations explained.
Limits and on-site verification
A sequence and a record template do not make a changeover safe or correct by themselves. The settings, criteria, cleaning method and release rules depend on the machine, the product and your quality system. Confirm them with real product and materials on the actual machine, and have qualified engineers and quality staff approve the changeover sheet.
Test the sequence by running a changeover with the people who will do it, a stopwatch and an observer. Note where people wait, search or improvise. Those steps are candidates to move from internal to external work, or to simplify.
Changeover work also reveals wear. Parts that no longer seat properly or settings that will not hold should go to maintenance and onto the preventive maintenance checklist.
References
- Shigeo Shingo, A Revolution in Manufacturing: The SMED System (translated by Andrew P. Dillon; Productivity Press, 1985) — Productivity Press (now Routledge/Taylor & Francis)
- ISO 12100:2010 — Safety of machinery — General principles for design — Risk assessment and risk reduction — ISO
- 29 CFR 1910.147 — The control of hazardous energy (lockout/tagout) — U.S. Department of Labor, OSHA (eCFR)
- PackML (Packaging Machine Language) - OMAC — OMAC (Organization for Machine Automation and Control)
- ISO 22400-2:2014 — Automation systems and integration — Key performance indicators (KPIs) for manufacturing operations management — Part 2: Definitions and descriptions — ISO
Update history
- : First published.
- : Added a release-evidence summary, a phone-readable step list, a copyable blank record, and short answers for a failed first-off, an open override, and who may sign the release.
Next steps
Packaging Machine Preventive Maintenance: Building a Site-Specific Checklist
Build a preventive maintenance checklist for packaging machines from OEM manuals, failure history, risk assessment and critical spares, with a task list.
Read guide
Finding Packaging Line Bottlenecks with Basic Production Data
Identify candidate packaging-line constraints using four analysis groups, measured good-pack counts and running rates, with a worked example and copyable shift log.
Read guide
Packaging Seal Defects: An Evidence-Based Investigation Checklist
Investigate packaging seal defects by containing suspect product, collecting evidence, testing with agreed methods and changing one variable at a time.
Read guide